Modify an AutoPay Payment
Recurring payments, also known as AutoPay payments, make it easy to pay your balance each billing period. You can manage your recurring payments from the eBill homepage.
To modify your AutoPay payments:
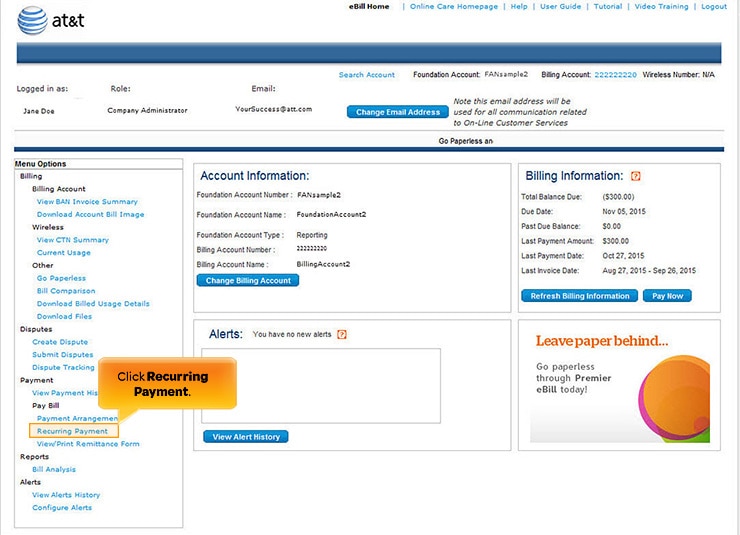
- On the eBill homepage, click Recurring Payment under Pay Bill.

Recurring Payment link. [View full-size image]
- If the Billing Account has an existing recurring payment (credit card, check card, or EFT), the Modify/Delete Recurring Payment page appears. For security reasons, some of your payment information is masked. Click Change Billing Account if you need to select a different billing account.
Note: If this billing account is not subscribed to a recurring payment, the screen changes to set up a new recurring payment.

Modify an AutoPay Payment. [View full-size image]
- Select Temporary Suspend next to Recurring Payment Status. If the recurring payment is already in a temporary suspend status, you can remove the temporary suspend.
- Click Submit. The Payment Verification page appears showing the recurring payment data for the billing account.
Note: You can't modify the recurring payment data while setting up a temporary suspend or while a temporary suspend is in effect.
- Verify the payment information is accurate, and then click Submit. The Recurring Payment Confirmation page appears. Your recurring payment doesn't take effect for one billing cycle and any balance due must be paid using another payment method. Save the confirmation number for reference.
- On the Payment Confirmation page, you'll have options to view your paperless billing status or return to the eBill homepage.
- If you modify or change your payment, you can pay your amount in full. In this case you need to cancel any future dated payments if you have any. If you have more than 2 pending payments, you can't modify a payment until you reduce the number of payments to two or less.
Note: If you modify a payment, the total amount must be greater than or equal to the minimum immediate payment amount.
- Click Submit. The Payment Verification page appears showing all the recurring payment data for the Billing Account. Verify that all the payment information is accurate, and then click Submit.
Note: You can't modify any of the recurring payment data while setting up a temporary suspend or while a temporary suspend is in effect.
The Payment Confirmation page appears. Your recurring payment doesn't take effect for one billing cycle, and any balance due must be paid using another payment method. Save the confirmation number for reference.
On the Payment Confirmation screen, you'll have options to view your paperless billing status or return to the eBill homepage.
